Retrieval Augmented Generation (RAG) using Gemma to Explain Basic Data Science Concepts
Published:
The world of data science can be daunting for newcomers, filled with complex terminology and intricate concepts. But what if you had an AI assistant by your side, ready to explain these concepts in simple terms and guide you through the learning process? This is where the power of Retrieval Augmented Generation (RAG) comes into play. In this blog post, we’ll embark on a hands-on journey, building an AI-powered explainer for data science concepts using the RAG model and the Gemma language model.
Why RAG and Gemma?
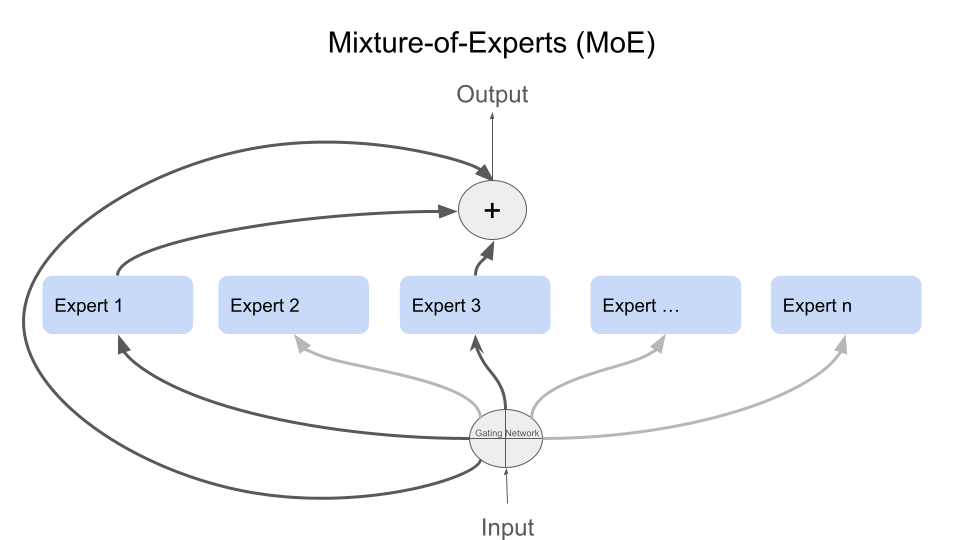
RAG is a powerful technique that combines a retriever model (to find relevant information) with a generator model (to create human-like text). This makes it ideal for tasks like explaining complex topics, as it can access and process vast amounts of information and then present it in a clear, understandable way.
We’ve chosen Gemma-1.1-2b-it, a language model developed by Google AI, as our generator. Gemma is known for its accuracy, efficiency, and ease of use, making it a perfect companion for our RAG system.
Retrieval Augmented Generation (RAG) using Gemma to explain basic data science concepts.
In this tutorial, we’ll use the Retrieval Augmented Generation (RAG) model to explain basic data science concepts. RAG combines a retriever and a language model to provide relevant and accurate responses to questions. 
Step 1: Install Required Packages
First, let’s install the necessary packages using pip:
pip install transformers accelerate bitsandbytes langchain sentence-transformers chromadb gradio huggingface_hub
Note: You must restart your notebook to avoid Gradio package errors
Step 2: Import Required Libraries
Next, let’s import the libraries we’ll need:
import os
import gradio as gr
from langchain.text_splitter import RecursiveCharacterTextSplitter
from langchain_community.document_loaders import WebBaseLoader
from langchain_community.vectorstores import Chroma
from langchain.chains import ConversationalRetrievalChain
from langchain_community.embeddings.sentence_transformer import SentenceTransformerEmbeddings
from langchain_community.llms import HuggingFaceEndpoint
Step 3: Load Data
Let’s load the data from a web-based source. In this example, we’ll use a data science glossary:
loader = WebBaseLoader("https://www.datascienceglossary.org/")
data = loader.load()
Code Explanation:
Create a loader object designed to fetch and process data from the Data Science Glossary:
loader = WebBaseLoader("https://www.datascienceglossary.org/")Call the loader’s ‘load’ method. This likely initiates the following steps:
- Fetching the website’s content
- Extracting relevant data (e.g., definitions, term lists)
- Structuring the extracted data
data = loader.load()
Step 4: Split Documents
To improve efficiency, we’ll split the documents into smaller chunks:
text_splitter = RecursiveCharacterTextSplitter(chunk_size=500, chunk_overlap=0)
splits = text_splitter.split_documents(data)
Code Explanation:
Purpose: The goal of this code is to break down larger text documents into smaller, more manageable chunks. This is often done for efficiency in natural language processing tasks where models might have limitations on how much text they can process at once.
text_splitter = RecursiveCharacterTextSplitter(chunk_size=500, chunk_overlap=0):- This line creates an object called
text_splitterwhich belongs to the classRecursiveCharacterTextSplitter. This class is designed to split text into chunks. chunk_size=500: This parameter controls the desired maximum size of each text chunk. Here, chunks will be approximately 500 characters long.chunk_overlap=0: This parameter sets the amount of overlap between chunks. Here, there won’t be any overlap.
- This line creates an object called
splits = text_splitter.split_documents(data):- This line takes the list of documents (which we assume is stored in the
datavariable) and applies the text splitting logic defined earlier. - The result is stored in the
splitsvariable, likely as a new list where each element is a smaller text chunk.
- This line takes the list of documents (which we assume is stored in the
Step 5: Create Vector Database
We’ll use SentenceTransformer to embed the text and create a vector database:
embedding = SentenceTransformerEmbeddings(model_name='all-MiniLM-L6-v2')
vectordb = Chroma.from_documents(documents=splits, embedding=embedding)
Code Explanation:
Purpose : This step transforms textual data into numerical vectors (embeddings) and stores them in a specialized database designed for quick searches and similarity comparisons.
1. SentenceTransformerEmbeddings
embedding = SentenceTransformerEmbeddings(model_name='all-MiniLM-L6-v2')- Creates an object named
embeddingresponsible for generating text embeddings. - It uses a pre-trained Sentence Transformers model called ‘all-MiniLM-L6-v2’. This model converts sentences/paragraphs into numerical vectors.
- Creates an object named
2. Chroma Vector Database
vectordb = Chroma.from_documents(documents=splits, embedding=embedding)- Creates a vector database named
vectordbusing the Chroma library. documents=splits: Uses the previously created text chunks (splits) as input.embedding=embedding: Specifies the embedding model to generate vectors for each text chunk.
- Creates a vector database named
Step 6: Create Retriever
Now, we’ll create a retriever using the vector database:
retriever = vectordb.as_retriever(search_type="similarity", search_kwargs={"k": 2})
Code Explanation:
Purpose: This step sets up a mechanism to search through the vector database you created earlier. The retriever will help you find text chunks that are semantically similar to a given query.
retriever = vectordb.as_retriever(...):- This line creates a
retrieverobject using thevectordb(your Chroma vector database). - The
.as_retriever()method of Chroma configures how the database will be searched.
- This line creates a
search_type="similarity":- This parameter tells the retriever that you’ll be searching for items in the database based on their similarity to a query (as opposed to searching by exact matches or other criteria).
search_kwargs={"k": 2}:- This provides additional search settings. Here, the key-value pair
k:2instructs the retriever to return the 2 most similar items from the database for a given query.
- This provides additional search settings. Here, the key-value pair
Step 7: Load Language Model
We’ll use a pre-trained language model from Hugging Face:
os.environ["HUGGINGFACEHUB_API_TOKEN"] = 'API_TOKEN'

repo_id = "google/gemma-1.1-2b-it"

llm = HuggingFaceEndpoint( repo_id=repo_id, max_length=1024, temperature=0.1)
Code Explanation:
Purpose: This step loads a powerful pre-trained language model (LLM) called “Gemma 1.1-2b-it” from the Hugging Face platform. This model will be the core of your application’s ability to generate text, answer questions, and perform other language-related tasks.
- Setting API Token
os.environ["HUGGINGFACEHUB_API_TOKEN"] = 'API_TOKEN'- This line likely retrieves a secret Hugging Face API token required to access and download the model.
- Specifying Model ID
repo_id = "google/gemma-1.1-2b-it"- This defines the unique identifier of the model on the Hugging Face platform. This tells the system to load the Gemma 1.1-2b-it model developed by Google.
- Loading the Model
llm = HuggingFaceEndpoint(repo_id=repo_id, max_length=1024, temperature=0.1)- Creates an object named
llmof the typeHuggingFaceEndpoint. This object provides an interface to interact with the loaded language model. max_length=1024: Sets a limit on the maximum number of tokens (roughly words or word parts) the model can process at once.temperature=0.1: Controls the randomness in the model’s text generation. Lower values lead to more predictable and deterministic output.
- Creates an object named
Step 8: Create Conversational Retriever Chain
Combine the retriever and language model into a conversational retriever chain:
qa = ConversationalRetrievalChain.from_llm(llm, retriever)
Code Explanation:
Purpose: This step integrates the vector-based retriever (for finding relevant information) and the language model (for generating text) into a single, powerful component. This chain enables a more natural question-and-answer experience for users.
qa = ...: This line creates a new object namedqawhich will represent your conversational retriever chain.ConversationalRetrievalChain.from_llm(llm, retriever):ConversationalRetrievalChain: This class (likely from thelangchainlibrary) provides the framework for building chains that combine different language models or components..from_llm(): A method to easily construct a chain starting with a language model.llm: This is where you pass your previously loaded language model object.retriever: You also provide the retriever object you created earlier.
Step 9: Define Conversation Execution Function
Define a function to execute the conversation:
def execute_conversation(question):
    chat_history = []
    result = qa({"question": question, "chat_history": chat_history})
    chat_history.append(result["answer"])
    return result["answer"]
Code Explanation:
Purpose: This step defines a function named execute_conversation that handles the core logic of interacting with your conversational AI system. It takes a question as input and generates an answer using the retrieval chain you built earlier.
Step-by-Step Explanation
chat_history = []- A list called
chat_historyis created to store the conversation’s progression (questions and answers). It starts empty.
- A list called
result = qa({"question": question, "chat_history": chat_history})- The
qaobject (yourConversationalRetrievalChain) is called. - It’s provided a dictionary containing the current
questionand thechat_history. - The chain processes this input and generates a result (which includes the answer).
- The
chat_history.append(result["answer"])- The answer generated by the chain (found in
result["answer"]) is added to thechat_historyto keep track of the conversation.
- The answer generated by the chain (found in
return result["answer"]- The function returns the generated answer as its output.
Step 10: Define Questions and Get Answers
Now, you can define questions and get answers using the execute_conversation function. It is better to choose questions from this page to make sure it works well:
https://www.datascienceglossary.org/
question1="What is data science?"
print(execute_conversation(question1))
question2="What is correlation?"
print(execute_conversation(question2))
question3="What is Mean Squared Error?"
print(execute_conversation(question3))
Step 11: Create a Gradio Interface
Finally, create a Gradio interface to interact with the model:
Note : It is better to choose questions from this page to make sure it works well. https://www.datascienceglossary.org/
chatbot = gr.Interface(
    fn=execute_conversation,
    inputs="text",
    outputs="text",
    live=False,
    title="RAG using Gemma to explain basic data science concepts.",
    description="Enter your question",
)

chatbot.launch()
Code Explanation: Purpose: This step creates a Gradio interface to interact with the model. What is Gradio? Gradio is a Python library specifically designed to help you quickly create visual web interfaces for your machine learning models. It lets you demonstrate, test, and share your models with others in a user-friendly way.
fn=execute_conversation: This is the core of your interface. It tells Gradio that the functionexecute_conversationis responsible for handling user input and generating the output. You would have defined this function earlier in your code to encapsulate your RAG model’s logic.inputs="text": Specifies that the interface will accept a single text input field where the user can type their question.outputs="text": Indicates that the model’s response will also be in the form of text.live=False: This setting means the interface won’t update in real-time as the user types. Instead, the model will process the question only after the user submits it.title="...": Sets the title of your Gradio interface, which appears in the web browser’s tab.description="...": Provides a brief description or instructions for the user, displayed below the input field in the interface. How It Works in the RAG Context - User Input: The user visits the web address where your Gradio interface is running and enters a question about a data science concept in the text box.
- Function Call: When the user submits their question, the
execute_conversationfunction is triggered. This function likely handles:
- Retrieval: Your RAG model retrieves relevant documents or passages from your knowledge base.
- Generation: The model generates a comprehensive answer based on the retrieved information and its understanding of data science concepts.
- Output: The generated response is sent back to the Gradio interface and displayed in the output text area. Launching the Interface
chatbot.launch(): This line starts the Gradio web server and launches the interface in your web browser, making it accessible for interaction.

Conclusion
In this tutorial, we demonstrated how to use Gemma LLM with RAG to explain basic data science concepts. By combining Gemma’s capabilities with RAG’s retrieval and generation features, we can create a powerful tool for understanding and explaining complex concepts in a user-friendly manner.
Check my notebook
@misc{data-assistants-with-gemma,
    author = {Paul Mooney, Ashley Chow},
    title = {Google – AI Assistants for Data Tasks with Gemma},
    publisher = {Kaggle},
    year = {2024},
    url = {https://kaggle.com/competitions/data-assistants-with-gemma}
}
 A journey of understanding, evaluating, and gaining deeper awareness of what truly makes a difference in the world of products.